
Welcome to our digital signage installation checklist. Use it to bring your installer, IT team, and site manager together before the first screen goes up.
At Uniview LCD, our work covers commercial display manufacturing, custom design, quality testing, and technical support. That hardware focus shapes this guide: check that the equipment fits the site, leave room for repairs, and agree on who handles support.
We built this guide by reviewing six industry installation articles, then turning the shared topics into checks your team can record and sign off. Each stage asks what to check, what evidence to keep, and who needs to act before handover.
You’ll learn what to confirm before installation, what to test before sign-off, and what your customer needs to take over the system. Use it alongside your chosen model’s instructions to help catch gaps early and reduce avoidable return visits.
Let’s start with the checklist at a glance.
Use this table to plan the work with your installer, IT team, and site manager. Give each check an owner and mark the result as Pass, Fail, or N/A. Add a reason for N/A so an untested item is not mistaken for a completed check.
| Area | What to Check | What to Record |
|---|---|---|
| Power | Supply, total load, outlet access, and startup after power returns. | Power details and restart test results. |
| Mounting | Mount fit, structural support, airflow, and room for repairs. | Approved drawings and installation photos. |
| Network | Connection, player and CMS compatibility, remote updates, and recovery. | Device IDs, settings, and test results. |
| Handover | Playback, records, account access, training, and support duties. | Signed checklist, guides, and open issues. |
Set the pass criteria using the chosen model’s instructions and the agreed project requirements. Before sign-off, make sure the receiving team can update content, check screen status, and report a fault.
Give your installer, IT team, and customer the same starting point: a clear site record, an agreed equipment list, and a named person for each task. Review these before booking the installation date so there’s time to resolve any gaps.
Start with photos and measurements of the actual location. A floor plan helps, but it may miss a blocked outlet, direct sunlight, or a door that limits access.
Match this site record to the chosen model’s specifications and installation guide. A window-facing display needs a review of sunlight and heat behind the glass. A screen exposed to rain needs a separate check of its outdoor suitability.
Compare delivered model numbers and parts with the approved order. If the project uses custom display design, record the approved drawing version, mounting points, and cable entries. Resolve any difference between the drawing and delivered unit before installation.
Make it clear who prepares each part of the site, who checks the work, and who accepts the finished system. One company may handle several tasks, but each task still needs a named contact.
| Task | Agree Who Will Handle It |
|---|---|
| Power readiness | Confirm the supply, outlets, and any electrical work. |
| Mounting readiness | Check the structure, approve the mounting plan, and fit the hardware. |
| Network access | Prepare the connection and approve the software’s network requirements. |
| Screen and CMS setup | Register devices, arrange licenses, and prepare test content. |
| Testing and sign-off | Run the checks, record results, and approve handover. |
| Ongoing support | Handle hardware, software, network, and site issues within the agreed scope. |
Share this list with your display supplier and local teams. Review unfinished tasks before the crew arrives. Give each one an owner and a due date. Resolve any item that prevents safe installation or testing before scheduling that work.
Check the power plan before your team mounts the screens. Use the specifications for each device, and have the site’s qualified electrical professional confirm that the supply suits the full setup.
Gather the power details for every item. For outdoor or custom displays, confirm whether the listed rating includes built-in cooling, heating, and other parts.
Record which device ratings were used to approve the power plan. If the player, heater, or another powered part changes, send the revised equipment list back for review before connecting it.
Walk through the cable route before fixing the display in place. Your team should be able to reach the power connection and safely disconnect equipment for service.
Take photos of connections and cable routes before they are hidden behind the screen.
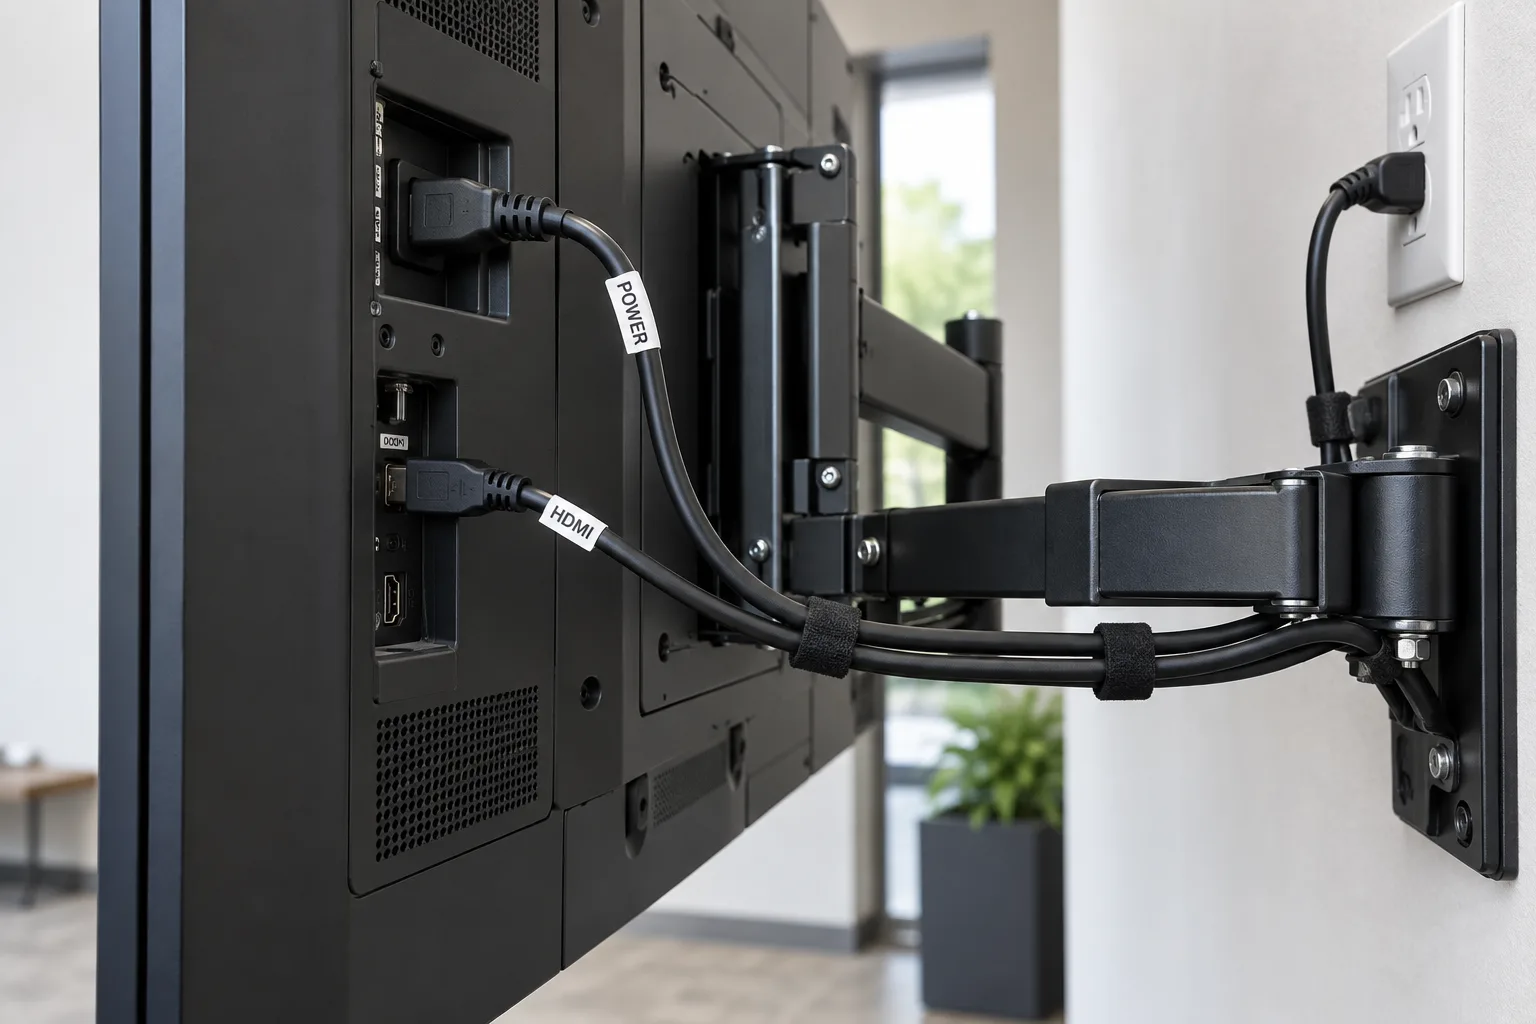
Agree on the test method and timing with the site team before interrupting power. Use the approved shutdown and restart procedure so the test does not disrupt other equipment.
When power returns, check that:
Record how long recovery takes and whether anyone needs to step in. If manual action is required, document the steps and confirm that the site team can follow them. Keep the power review, settings, and recovery results for handover.
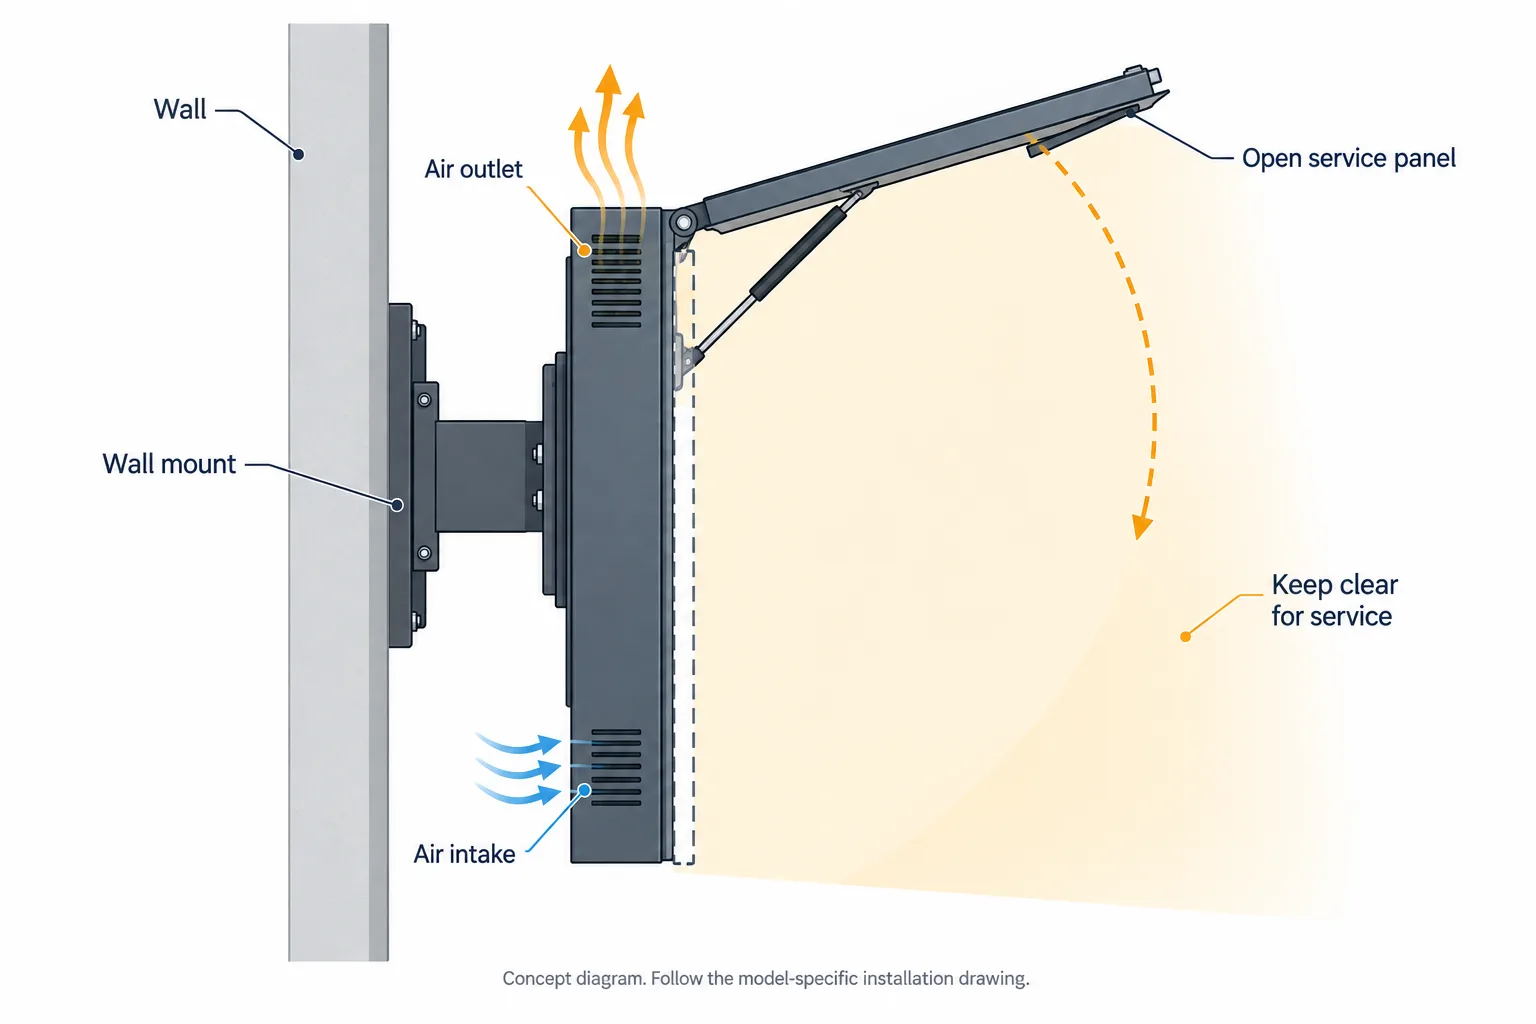
Before fixing a display in place, check how it will be supported, cooled, and serviced. Review the plan with your installer and display supplier so each team knows what the site and equipment require.
Match the mount to the exact display and attached equipment. For a VESA mount, check both the hole pattern and supported weight, as explained in Ergotron’s VESA mounting guide. Have the responsible installer or structural professional check the wall, pole, or base and the planned fixing method.
Resolve mismatches before drilling or changing parts. Record approved changes so the installer and supplier share the same plan.
Set aside service space on the installation drawing. Check the door swing, tool access, and path for taking out parts before approving the screen position. A space that fits the closed cabinet may still be too small for a repair.
For example, the V130L outdoor wall-mounted display supports front maintenance. Check its opening space against the approved drawing. If a planned repair still needs lifting equipment or full removal, record the crew, access, and equipment it will need.
 Add Checks for Outdoor and Window-Facing Displays
Start with the site’s exposure and the exact model’s limits. Our guide to outdoor signage planning factors covers the wider site choices. Use the checks below to confirm that the finished installation follows the agreed design.
The IEC 60529 IP Code classifies enclosure protection. Record the IP rating for the supplied setup, then check temperature, sunlight, and mounting limits separately. Keep photos of fixing points, cable entries, and service space with the approved drawings and model instructions.
Bring your customer’s IT team into the plan before installation day. Share the player details and CMS requirements. Agree on how devices will connect, who can manage them, and what you will test before launch.
Check the exact player model and operating system version against the CMS provider’s supported device list. An Android label or smart TV feature alone does not confirm compatibility.
Record the tested setup. If a player, app, or system version changes before delivery, review whether the affected tests need to be repeated.
Test the connection where the screen will sit. Share the chosen platform’s official network requirements with IT so they can approve the setup.
Use the requirements for your selected platform and features. Port settings from another signage system may not apply to your project.
Choose a test update that your team can clearly identify, such as a slide with the site name and test time. Send it from the CMS and check the physical screen. Save evidence that links the update to the correct device ID and site label.
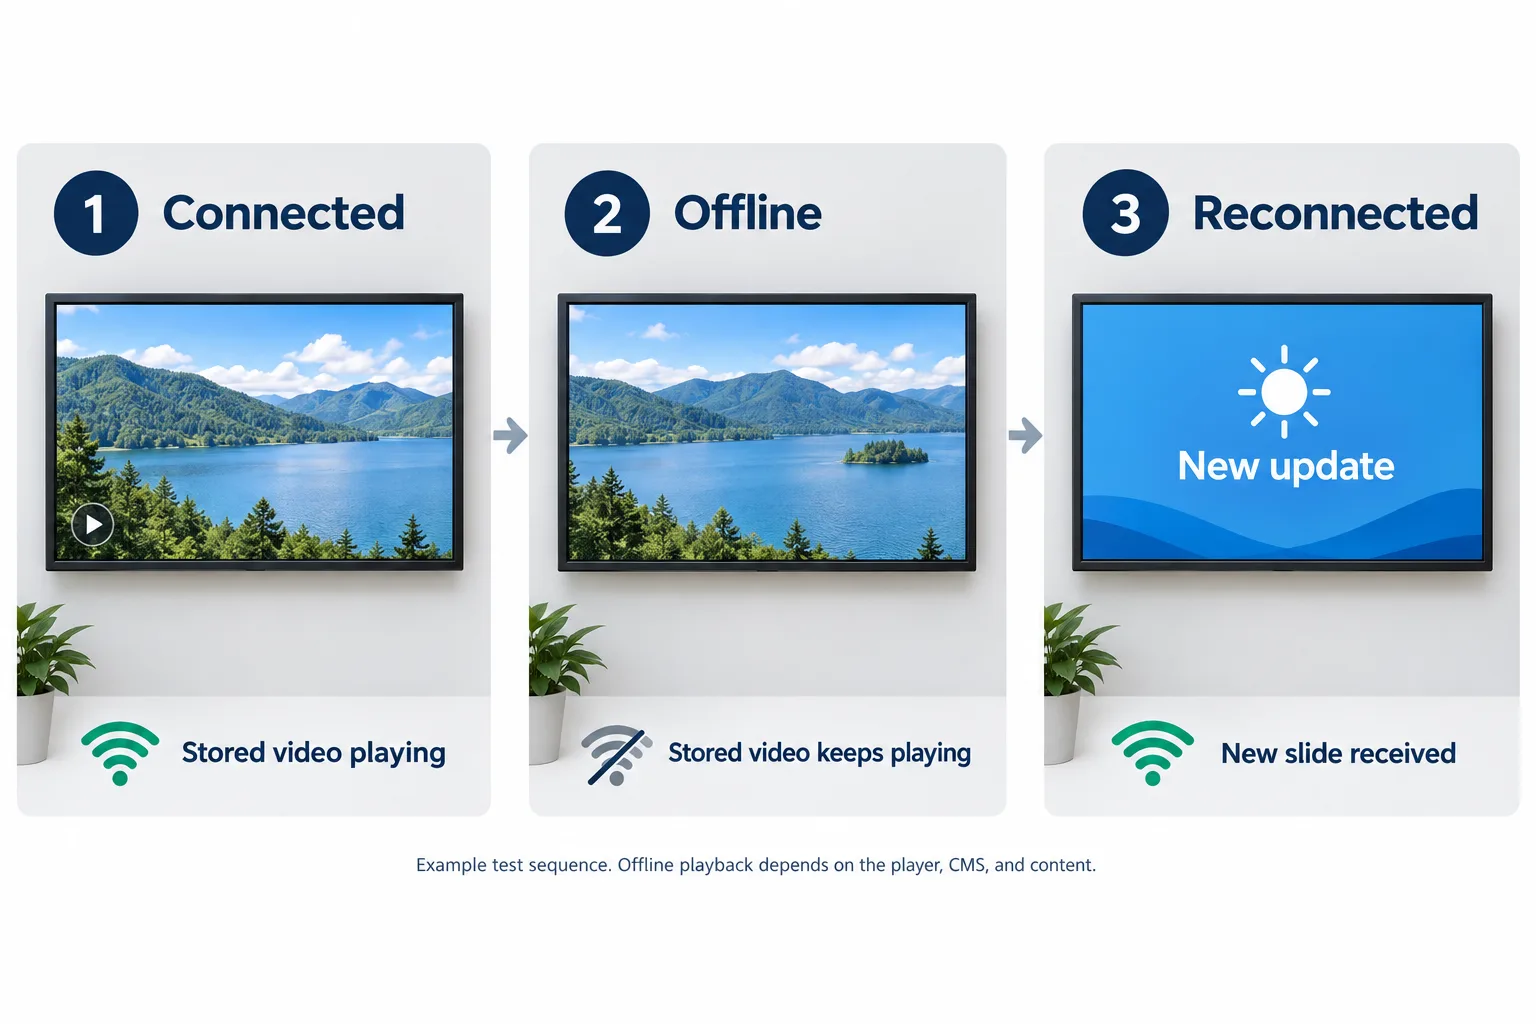
With the site team’s approval, test a network interruption and check:
Record offline results by content type, along with the time taken to reconnect. A stored video and a live dashboard may behave differently. Note any manual steps needed to restore updates or remote access, and repeat failed checks after the fix.
 Handover Checklist: Test, Document and Sign Off
Make handover a shared check of what was delivered. Agree on the tests and the person who can accept the results before the final visit. The handover record should show what passed, what remains open, and who takes responsibility next.
Test the installed setup using the customer’s approved content and day-to-day tasks. Have the person responsible for sign-off review the results. A screen showing a welcome slide does not prove that schedules, remote updates, and recovery all work.
Agree on the test duration, site conditions, and pass criteria before testing begins. Use this table as a starting point:
| Test | Pass Criteria |
|---|---|
| Display quality | Screen direction, image proportions, and clarity match the approved content sample. |
| Content schedules | Correct content starts and changes at agreed times, using the site’s time zone. |
| Remote updates | An authorized user can publish an update and confirm it appears on the correct screen. |
| Power and network recovery | The system returns to the agreed state after each approved interruption test. |
| Interactive features | Touch controls and connected devices complete the agreed tasks, where fitted. |
| Operation in site conditions | The system meets the agreed checks during the recorded test period and conditions. |
For each test, record the screen ID, date, tester, expected result, and actual result. Add photos, screenshots, or logs where they help show what happened.
Keep factory test reports and site acceptance records separate. Uniview’s quality testing process provides context for factory checks; request the records that apply to your supplied model and project. Site acceptance checks the complete system in its final location. If seasonal heat, rain, or another condition was not tested, record that limit and agree on any follow-up check, owner, and date.
If a test fails, record the issue, assign an owner, and agree on a retest date. Make sure everyone understands whether it blocks sign-off.
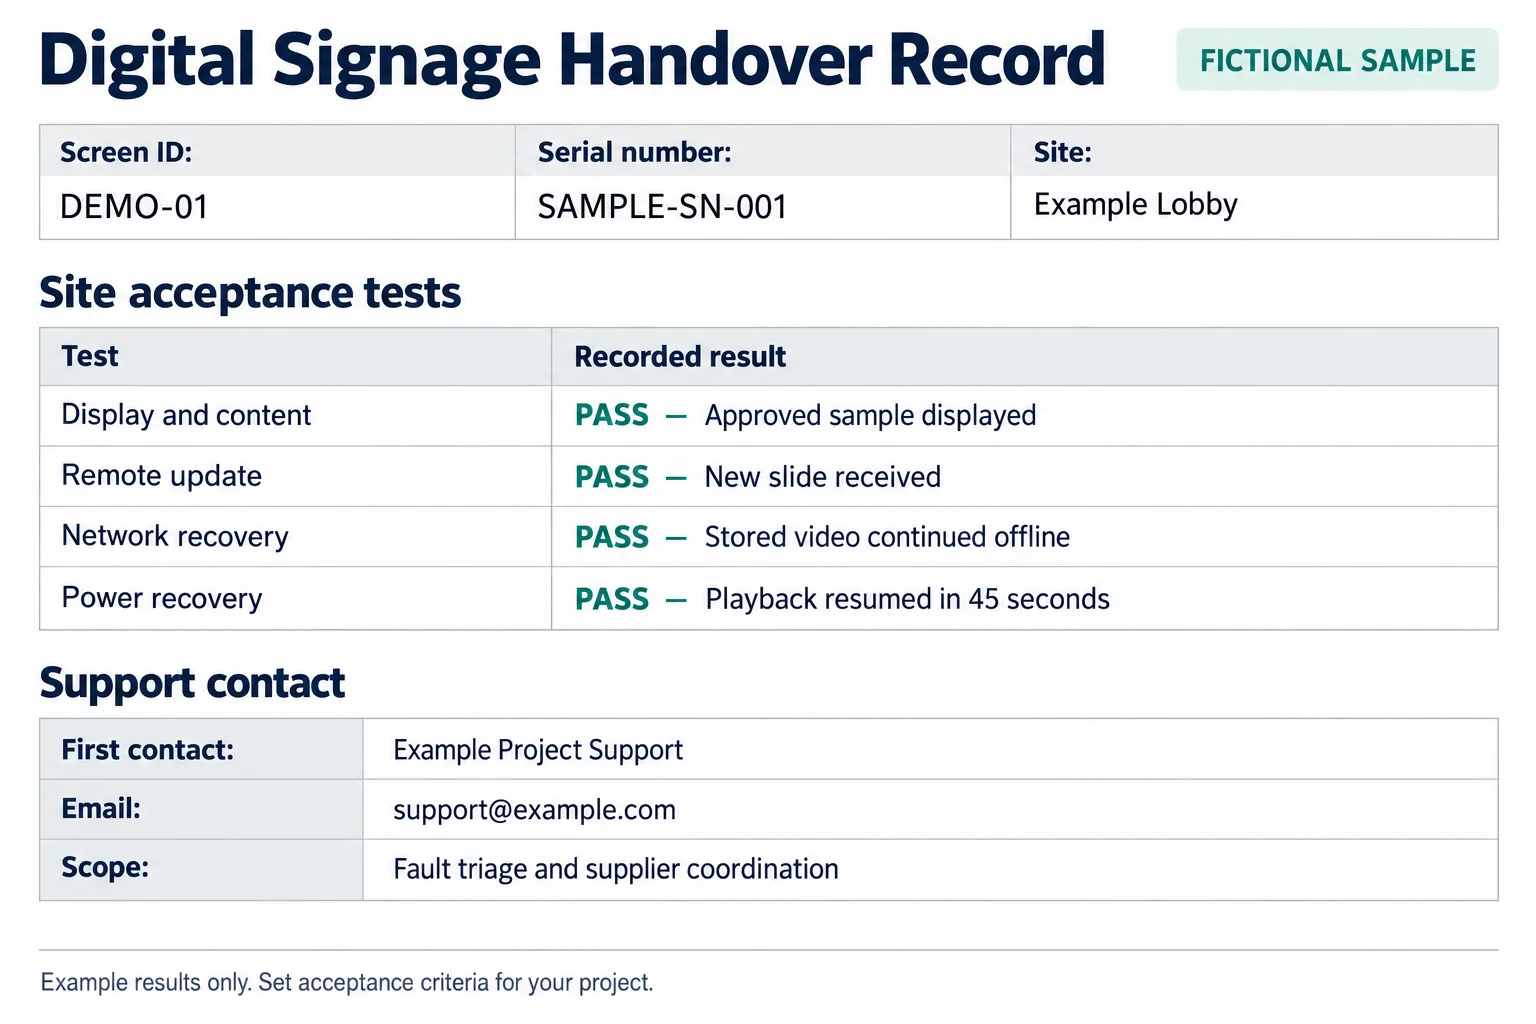
Build the handover pack around the site and device IDs. The receiving team should be able to pick a screen in the asset list and find its drawing, settings, test results, and support details.
Use matching names across the equipment list, CMS dashboard, and site labels. A support contact should be able to tell exactly which screen needs attention.
Ask the receiving team to open the handover pack and find the records for one installed screen. Fix missing files or access limits before sign-off. Transfer passwords through the agreed secure method, outside the shared acceptance forms.
 Transfer Access and Train the Operating Team
Ask the receiving team to complete the tasks below using its own approved accounts. Keep your installer or support contact available to help, then repeat any task the team cannot yet complete.
Before handover, confirm that they can:
Transfer account ownership and access through the agreed secure process. Review installer accounts with the customer and remove access that is no longer needed. Keep ongoing support access within the agreed scope.
Record who attended, which tasks they completed, and any follow-up training needed.
Give the customer a clear first contact for each fault type. For projects with several suppliers, name the person who will coordinate issues that cross those boundaries.
| Support Area | What to Confirm |
|---|---|
| Display hardware | Who checks faults, approves repair or replacement, and handles warranty claims. |
| Player and CMS | Who handles app errors, licenses, playback, and software updates. |
| Site network | Who checks connections, access rules, and local network outages. |
| Mounting and installation | Who handles fixing, cabling, enclosure, and site access issues. |
List what a fault report needs: site ID, model, serial number, symptoms, time of failure, recent changes, and relevant photos or logs.
Check the terms that apply to your order. For Uniview equipment, review the after-sales service policy alongside your project contract. Record warranty dates, exclusions, and the claim process. Name who handles remote diagnosis, spare parts, shipping, labor, and site visits. Keep response targets separate from repair targets. For cross-border projects, agree on the parts route, return process, and costs before a fault occurs.
Review all open issues with the customer. Give each one an owner, due date, and clear condition for closure. Record any limits on use until it is resolved.
Have the authorized parties sign the acceptance record, including agreed exceptions. Give the customer a copy so both teams share the same record of what was delivered, tested, and still needs attention.
Have the approved equipment list, mounting plan, power supply, and network access ready. Confirm that the crew can reach the work area and that required parts are on site. Assign contacts for installation, IT setup, and sign-off. Prepare CMS accounts, licenses, and test content so the team can check the full system during the visit.
It depends on your player, software, and content. Some setups can keep playing files stored on the device. Live dashboards, web pages, and streams may stop or show older information. Test your planned content offline, then check that updates and remote access work again when the connection returns.
Compare the exact model’s limits with the site’s sunlight, temperature, rain, and dust exposure. Check the structure, cooling space, seals, cable entries, and any drainage paths. Confirm that trim and mounts leave vents and sensors clear. Ask the supplier to review changes that may affect the enclosure or cooling.
Include the equipment list, serial numbers, final drawings, cable labels, settings, and software versions. Add operating guides, maintenance steps, relevant model documents, and site test results. Keep factory reports separate from site records. Include warranty terms, support contacts, training records, and open issues with owners and due dates. Transfer passwords through the agreed secure method.
 English
 Chinese (Simplified)
 Japanese
 Spanish